
One signal. The whole vehicle answers.
Flick the turn signal and the left whip goes amber, the left rock lights sweep with it, the left pod rings follow — while every channel you left out keeps running the pattern you chose. If your vehicle can send the signal, RhinoLink can give it a job.
- Turn signal
- Brake
- Reverse
- Hazard
- Door / courtesy
- Rocker switch
- Switch panel
- Custom 12 V input
Now shipping. First production units are going out to customers.
- 5RGB channels
- 12Vehicle inputs
- 8Relay triggers
- iOSRhinoLED app
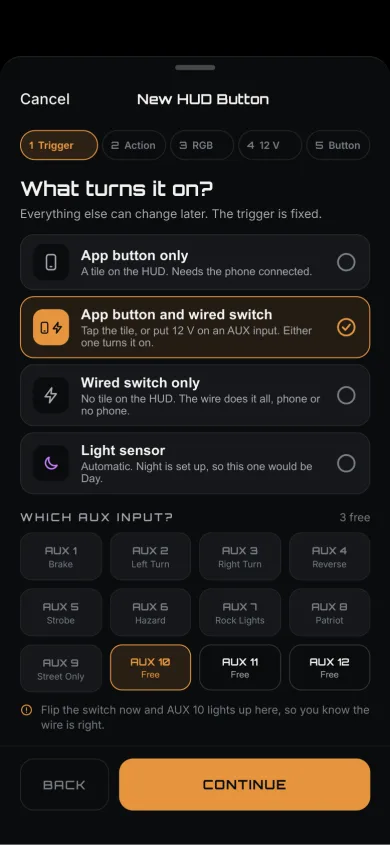
How a trigger works
Eight decisions in the app. After that it runs on the vehicle, with or without your phone.
The wire is generic. The meaning is software.
Input 4 is not “the brake input” until you tell the app that is what it is. Change your mind next weekend and the same wire becomes the door input instead — a different job, a different channel, no harness surgery. That is the difference between mapping a signal and hard-wiring one.
What counts as a signal
RhinoLink reads switched 12 V signals — the kind a turn, brake, reverse, courtesy or accessory circuit already provides. Not every circuit on every machine is a clean switched source, so check what you are tapping before you tap it.
The signal arrives
A supported 12 V vehicle signal lands on one of RhinoLink's 12 inputs. Turn, brake, reverse, door, a rocker on the dash — whatever you wired to it.
Choose the RGB action
Pick what the lighting should do when that signal goes live. There are 21 trigger actions to choose from, and the app lists every one of them as you configure.
Choose the channels
Select which of your 5 channels the action touches. Left side only, rear only, all of them. Everything you leave out carries on as it was.
Attach outputs
Optional. Point the same trigger at any of the 8 relay outputs, so one signal moves the lighting and switches hardware together.
Set the priority
A number from 5 to 150 that decides who wins when two vehicle functions want the same channel at the same moment.
Set the debounce
0–1000 ms per input. Long enough to ignore the electrical chatter of a bouncing contact, short enough to keep the real signal instant.
It saves to the board
About 5 seconds after your last edit the configuration is written to the controller — and force-saved if you disconnect before that.
Watch it live
Move the actual lever and the tile lights up in the RhinoLED HUD. The board pushes the state as it changes; the app is not polling for it.
Builds you can configure
None of these are factory defaults. Each one is a trigger you set up — your input, your action, your channels. The channel names below are the ones you type into the app.
- Left Whip
- Right Whip
- Rock Lights
- Pod Rings
- Halos
Turn signal build
- Input
- The left turn circuit, on one of the 12 inputs. The right side gets its own input and its own mirrored configuration.
- Lights
- Left Whip goes amber. The left-side Diamond RGB rock lights you selected animate with it. The left Pod Rings go amber alongside them.
- Untouched
-
- Right Whip
- Halos
- In the app
- The Left Turn tile lights up in the HUD the instant the lever moves.
Reverse build
- Input
- The reverse circuit. One wire.
- Lights
- The channels you selected go white — rear channels lighting the ground behind you, Pod Rings switching over with them, Rock Lights if you want the sides too.
- Output
- The same trigger fires a relay output: backup pods, a work light, whatever that relay runs.
- On release
- Shift out of reverse and those channels return to the runtime state they held before the trigger took them.
Door and puddle build
- Input
- A door pin switch or the courtesy circuit.
- Lights
- The Rock Lights you selected come up as puddle and step lighting — so the ground beside the machine is lit before anyone steps down onto it.
- Output
- Add a relay output if you want an accessory on with it.
- Debounce
- This is where the 0–1000 ms setting earns its keep. A door switch is a mechanical contact, and mechanical contacts bounce.
Switch panel build
- Input
- A rocker on the dash, or a button on your switch panel.
- Choose
- An RGB scene across the channels you pick. Or a relay output. Or both — from one trigger configuration.
- Labelling
- The tile in the HUD carries the name you gave it, so the app reads Camp Mode rather than an input number.
- Priority
- Give it a floor of your own, anywhere in the 5–150 range, so it slots in above or below the rest of your build.
Accessory and RGB, combined
- Input
- One button. One trigger configuration carrying a trigger action and relay outputs at the same time.
- Lights
- Rock Lights and Pod Rings drop into a low amber camp scene.
- Output
- In the same instant, an output fires the relay that runs your light bar.
- Why it matters
- The commodity model splits this in two: a Bluetooth controller for the LEDs, a separate switch panel for the accessories, and nothing joining them. RhinoLink puts both on one trigger.
The lights these builds run
- Runs on it
- Diamond RGB rock lights Rhino 2.0 whips — 1" RGB Rhino 2.5 Fattie whips — 1.3" RGB Rhino RGB halos RGB strip Rhino Pod RGB rings Axion RGB+W rock lights Rhino 3.0 RGB+W whips RGB+W strip
- Scope
- RhinoLink runs Rhino RGB and RGB+W lights on any of its channels, all in sync. Set each channel to the lights on it in the RhinoLED app.
A pod's RGB ring is part of the RGB system and can join a channel. A pod's high-output main beam is not an addressable channel — it is switched through an appropriately wired external relay off a RhinoLink output.
When two functions want the same channel
Reverse and a running pattern can both want the Rock Lights. RhinoLink decides which one gets the channel, instead of letting two commands fight over it.
- 100 Reverse
- 80 Turn / Hazard
- 70 Brake
- 65 Street Only
- 60 Patriot
- 55 SOS
- 40 Standard actions
These are floors, not ceilings
Each action starts at the number above. You can raise it anywhere in the 5–150 range when your build wants a different order.
Reverse holds the top floor
Backing up is the moment you most need the channel to do one predictable thing, so reverse starts at 100 — above turn, brake and everything decorative.
Only the contested channel changes
Priority is settled per channel. A brake trigger winning the rear channels does not disturb a whip channel nobody asked for.
Interrupt a channel. Don't break the whole show.
A trigger borrows a channel; it does not reset your build. While the trigger is active that channel does the trigger's job. When it releases, RhinoLink puts the channel back.
What comes back
- The channel's pattern, colors, brightness and speed return.
- If another channel is still running that same animated pattern, the returning channel re-joins that live animation.
- With no matching peer still running it, an animation may start again from the beginning.
- A solid color restores directly.
This is trigger restore, and it is a different feature from a Startup Profile. A Startup Profile decides how the vehicle wakes up at power-on. Trigger restore is what happens the instant a brake pedal or a turn lever lets go.
- Your pattern
- Trigger active — selected channels white
Reverse takes the channels you selected and fires the relay. Release it, and the build comes back.
The action catalogue
21 trigger actions, plus a relay-only mode. You do not have to memorise them — the app lists the set when you configure a trigger. This is the shape of it.
- 21Trigger actions
- 8Relay outputs
- 3Output modes
- 0.5–10 HzPulse / strobe rate
Automotive
- Left turn / right turnAmber signalling across the channels you chose
- BrakeTakes the rear channels the moment the pedal goes down
- ReverseThe highest priority floor on the board
- HazardShares the turn floor, both sides at once
- Street OnlyA driving-oriented base mode that sits above the decorative patterns and below turn, brake and reverse
Scene and signal
- Pattern and color actionsSend the selected channels to a chosen look
- StrobeA high-contrast attention pattern on demand
- SOSSits above the standard actions, below the driving functions
- PatriotIts own floor in the ladder above
- Cycle active modeSteps the active mode on from a single button
Outputs
- No LED Action — relay onlyA trigger that fires outputs and leaves every channel alone. It is a mode on a trigger, not an extra action in the list
- SolidOutput held on while the trigger is active
- PulseRate configurable from 0.5 to 10 Hz
- StrobeSame configurable 0.5–10 Hz range, faster end of it
Work lights, bar, fan, compressor, backup pods
That is what the 8 outputs are for — hardware that turns on because the vehicle did something. Wire the accessory through its own relay and let RhinoLink switch the coil.
The outputs trigger external relay coils. They do not power a high-current accessory directly — always put an appropriately rated relay between RhinoLink and the load.
Configured once. Then it runs on the vehicle.
Every trigger you set up is written to the controller — about 5 seconds after your last edit, and force-saved if you disconnect first. From then on the vehicle functions do not wait on your phone. Hit the brake with the phone in your pocket, in the truck, or flat on the charger: the channels respond, because the logic is on the board. The rest of what the controller does — channels, patterns, themes, how the vehicle wakes up — is on the RhinoLink overview.
What the app is for
RhinoLED builds the system: triggers, channels, actions, priorities, output labels — plus interactive control when you want to drive the lighting by hand. iPhone, iOS 15.0 or later, free download.
The link stays part of it
Bluetooth Low Energy is how you reach the controller to change anything and how the HUD watches it live. Name the board whatever you like, up to 31 characters.
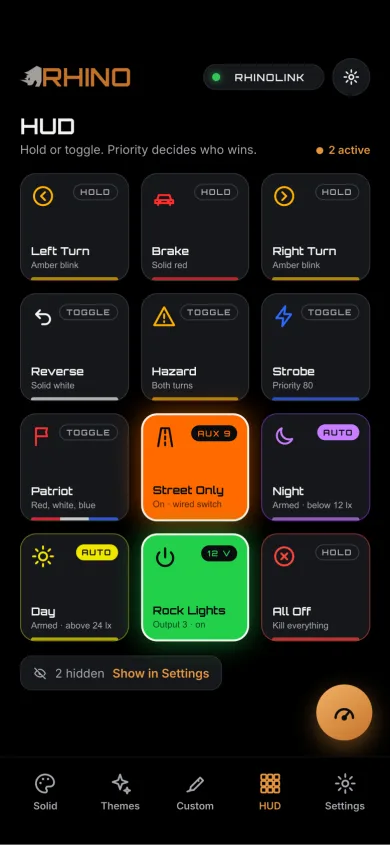
Name the tiles and the HUD reads like your build — “Inside Light”, “40 Inch Bar” — instead of channel numbers. The board pushes state as it changes, so the tile you are looking at is the one the vehicle is running.
Give one wire a new job.
5 RGB channels, 12 vehicle inputs, 8 relay triggers and the RhinoLED app.
Now shipping. First production units are going out to customers.
More on RhinoLink: RhinoLink overview · automotive patterns · Startup Profile · controller settings
RhinoLink controls auxiliary and accent lighting. It is not a replacement for required factory vehicle lighting. Lighting regulations vary — check local requirements before public-road use.